



























The Challenge of Disconnecting and Removing Heavy Bathroom Toilets
Removing an old toilet is an essential first step when upgrading to a modern water-saving fixture, replacing worn bathroom flooring, or repairing a cracked porcelain bowl. However, many homeowners delay necessary bathroom improvements due to fears of accidental water spills, stubborn bolts, or damaging fragile closet flanges. Attempting to lift and pull a toilet without properly draining the bowl and tank leads to messy spills on bathroom subfloors and potential physical back strain. Sourcing a clear, beginner-friendly removal protocol makes this fundamental plumbing project manageable for any DIYer.
Furthermore, lifting a heavy porcelain fixture without cutting underlying floor caulk or disconnecting fragile tank bolts can crack the porcelain or destroy the closet flange underneath.
Why Skipping Water Extraction and Ignoring Old Floor Seals Causes Renovation Headaches
Attempting to yank a toilet off the floor without methodical preparation introduces several common plumbing bottlenecks:
-
Trapped Water Spills: Simply flushing the toilet leaves several cups of stagnant water in the tank and trapway, which pours out onto bathroom flooring during lifting if not sponged dry.
-
Cracked Closet Flanges: Trying to pry up a toilet that remains glued to the floor with old caulk or frozen closet bolts can snap fragile PVC or cast-iron floor flanges.
-
Residual Wax Seal Blockages: Failing to scrape away sticky, contaminated old wax ring residue leaves an uneven surface that prevents new replacement wax rings from creating a watertight seal.
Settling for sloppy demolition work or messy water leaks leads to subfloor wood rot, foul odors, and unnecessary contractor repair bills.
The Solution: Methodical Draining, Clean Unbolting, and Proper Flange Preparation
The ultimate strategy for a clean, effortless toilet removal relies on executing a systematic step-by-step process. In just 30 to 45 minutes, homeowners can shut off water supply lines, extract remaining standing water with a sponge, slice floor caulk joints, unbolt the fixture, and scrape the closet flange clean for the new installation.
By following proper ergonomics, protecting flooring with heavy-duty trash bags, and cleaning off old footprint outlines, home renovators ensure a smooth transition to their replacement toilet.
Project Overview & Technical Requirements
Before beginning the removal process, gather basic household tools and safety gear.
| Metric / Requirement | Specification Standard |
| Working Time | 30 to 45 minutes |
| Skill Level | Beginner DIY |
| Estimated Material Cost | $0 (using basic hand tools) |
| Core Equipment Needed | Tongue-and-groove pliers, flathead screwdriver, utility knife, putty knife, sponge, bucket, rubber gloves |
Step-by-Step DIY Toilet Removal Protocol
Follow this 5-step instructional sequence to disconnect and remove your toilet cleanly and safely.
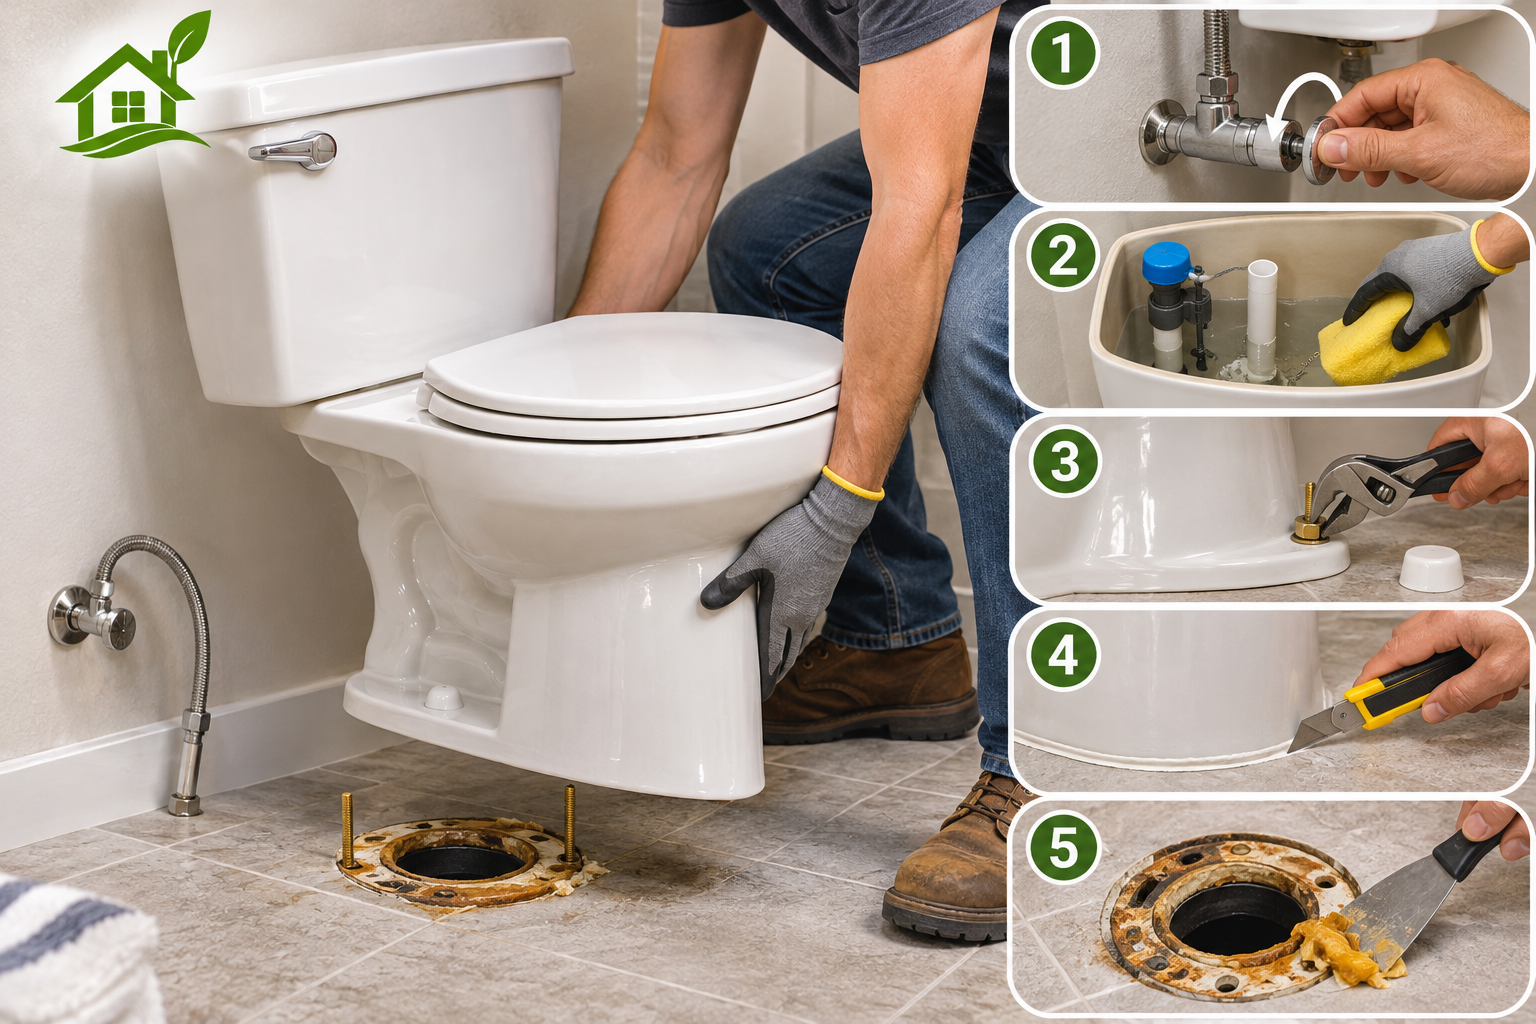
01. Shut Off Water & Completely Drain the Fixture
-
Shut Off Water Supply: Locate the shutoff valve on the wall or floor beneath the toilet tank. Rotate the valve handle fully clockwise until tight. (If replacing the shutoff valve itself, turn off the main house water valve).
-
Flush the Tank: Press and hold the flush handle down until all water drains out of the tank into the bowl.
-
Sponge Out Standing Water: Put on latex or rubber gloves. Use a large sponge to soak up remaining water in both the tank and the bottom of the toilet bowl, wringing the water out into a bucket until both chambers are bone dry.

02. Disconnect Supply Lines & Remove Tank Bolts
-
Disconnect Supply Hose: Use tongue-and-groove pliers to loosen and unscrew the plastic mounting nut connecting the water supply tube to the fill valve shank underneath the tank.
-
Unbolt Base Caps: Pop off the plastic bolt covers at the base of the toilet bowl using a flathead screwdriver to expose the closet floor bolts.
-
Separate Two-Piece Toilets (Optional but Recommended): On two-piece toilets, remove the nuts underneath the tank holding it to the bowl. Hold the slotted bolt heads inside the tank with a screwdriver while turning the bottom nuts with pliers, then lift the tank straight off to reduce weight. (For one-piece toilets, skip this step).

03. Cut Caulk & Break the Floor Seal
-
Slice Perimeter Caulk: Run a sharp utility knife around the perimeter base of the toilet where it meets the floor to cut through the old caulk layer.
-
Rock the Bowl: Gently wiggle the toilet bowl from side to side to break the seal created by the wax ring and floor caulk.

04. Lift & Pull the Toilet Base
-
Lift Straight Up: Straddle the toilet bowl, bend at the knees, and lift the fixture straight up off the threaded closet floor bolts. (Get a helper for heavy one-piece toilets to avoid back strain).
-
Bag the Fixture: Place the removed toilet immediately inside a large, heavy-duty trash bag to contain any residual water drips while carrying it out of the bathroom.

05. Clean Floor Surface & Closet Flange
-
Scrape Old Wax: Use a flexible putty knife to scrape all old sticky wax residue off the metal or plastic closet flange sitting over the drain pipe.
-
Remove Old Caulk & Residue: Scrape away old floor caulk and clean any discolored footprint outlines left by the old base so the flooring is spotless before setting down the replacement toilet.
-
Block Sewer Gas: Stuff an old rag temporarily into the open drain pipe hole to stop sewer gas odors from venting into the room while you work.

4-Step Actionable DIY Summary Protocol
To execute a clean, spill-free toilet removal today, follow these core steps:
-
Sponge Tank & Bowl Bone Dry: Flush the toilet and sponge out all remaining standing water into a bucket to eliminate floor spills during lifting.
-
Disconnect Water Line & Unbolt Base: Unscrew the flexible supply line nut and remove base closet bolt nuts using tongue-and-groove pliers.
-
Slice Floor Caulk & Lift Upward: Cut the perimeter caulk joint with a utility knife, rock the bowl to break the wax seal, and lift straight up off floor bolts.
-
Scrape Wax & Plug Open Drain: Scrape old wax off the closet flange with a putty knife and stuff a rag into the open sewer pipe to block gas odors.
Proven Home ROI Across Bathroom Upgrades
Real-world plumbing maintenance and contractor guidance confirm clear practical benefits:
-
Eliminates Contractor Service Costs: Performing toilet removal yourself saves $50 to $200 in professional plumber labor fees.
-
Prevents Subfloor Moisture Rot: Complete water extraction and clean wax removal protect subfloor wood structures from hidden leaks.
-
Simplifies New Fixture Setting: Pre-cleaning old caulk outlines and scraping closet flanges clean guarantees a watertight, level fit for replacement toilets.
Options for Old Toilet Disposal
Once your toilet is removed, choose one of these common disposal routes:
-
Municipal Bulk Trash Pick Up: Contact your local waste department to schedule a heavy-item curbside pickup.
-
Local Landfill Drop-Off: Transport the bagged toilet directly to your county waste transfer station or landfill.
-
Porcelain Recycling Centers: Inquire with local recycling services to see if crushed porcelain is accepted for concrete aggregate reuse.
-
Habitat for Humanity ReStore: Donate functional, non-cracked 1.28 GPF toilets to local building material charities.
Elevate Your Bathroom Renovation Today
Do not let fears of water spills, heavy lifting, or messy wax rings delay your bathroom upgrade. Following this systematic 5-step removal guide—from complete water extraction and supply line disconnection to wax scraping—guarantees a clean, safe, and stress-free toilet removal for your home.
Start gathering your tools and preparing your bathroom space today!
Are you replacing your old toilet with a sleek one-piece model, an eco-friendly dual-flush unit, or updating your bathroom floor tile?